If you can't view the answer to your question on this page, please contact us.
General Questions
ALA Connect is an online platform for discussion and collaboration between ALA members. We’re working together to make Connect a centralized space for members to communicate online, whether they’re part of a formal ALA committee or just want to share questions and ideas with other library professionals. Connect allows users to:
- Talk with other members on discussion boards
- Download shared resources from community-generated libraries
- Collaborate as a member of volunteer committees and other groups.
Personal ALA memberships include access to ALA Connect. Your login credentials are the same username and password that you use to log in to the main site. If you have forgotten or never received your login credentials, please click here.
Some ALA Connect communities allow access without a paid ALA membership. To access these communities, you can create a free account.
- If you navigate to a page that requires login, you will be taken to a page with three options, one of which allows you to create a free account.
- In the resulting window, enter your email address and last name. The system will confirm whether you have an account in our system already. If an account exists, you will be given password recovery options.
- For a new account, complete the contact details. Save changes once complete. Login to Connect and select the Join Community button on the community they would like to join or have the admin send an invite link via email.
Your login credentials are the same username and password that you use to log in to the main site. If you have forgotten your login credentials or need assistance with your login information, please click here.
Profile / Account
- Log in to Connect
- Click the arrow next to your name in the upper right corner, then select "Profile". This will take you to your profile page.
- To edit your name, title, organization, and demographic information: click the button next to your name
- Note that right now, your ethnicity doesn't display anywhere on your profile, even to you. It's only found in this edit window. We encourage you to answer the question so that we can analyze accurate demographics about our membership in the aggregate so that we'll know if we're making progress on our efforts to be more inclusive. We will never share this information about you except in the aggregate.
- Any changes made in this form will change the information on your ALA member profile, including changes to your name.
- To update your communication preferences and addresses: click the button under "Contact details" in the left column
- Click on the Refresh My Profile! link underneath your contact details to publish your changes.
Filling out your profile and adjusting your Privacy Settings will let you create a rich profile you can share publicly on your résumé or a minimal version for just those colleagues you add to your contacts in the system. Or add no information than you've already provided - it's all up to you. Optional information you can share:
- A bio field where you can share information about yourself
- Your education history
- Your work history
- Professional associations you've joined
- Honors and awards you've received
- Links to social media accounts and other websites
- Your interests
-
- This information is publicly visible by default
- Your name
- Your profile photo, if you've chosen to add one
- The name of the organization where you work if you've provided this in your member record
- This information is visible to other ALA Connect users by default
- Your name (this information is also available through basic and advanced searches)
- Your profile photo, if you've chosen to add one
- The name of the organization where you work if you've provided this in your member record (this information is also available through basic and advanced searches)
- Your job title and department if you've provided this in your member record
- Your bio if you've filled this out in Connect
- Your work and education history if you've filled this out in Connect
- Honors and awards if you've filled this out in Connect
- Professional groups and associations if you've filled this out in Connect
- A list of communities you participated in on Connect (this information is also available through advanced searches)
- Networks you're part of in Connect
- Mutual contacts you have in common with each other
- Your social media accounts and links to them and other sites if you've added this information in Connect
- Your interests if you've filled them out in Connect (this information is also available through advanced searches)
- An "Add as Contact" button (which will require you to approve the request)
- A link to send you a message through the Connect system (your email address will not be exposed to the sender)
- This information is visible only to you by default
- Your mailing address
- Your phone numbers
- Your email address
- Your ethnicity
To view a short video on this,
click here.
- Sign In and navigate to your profile. (You can use the Avatar at the top right of any page in Connect once you login.)
- Select the My Account tab on the profile page.
- Select Privacy Settings from the drop down list.
- Select which profile elements you would like viewable and by which group of users
- Only Me: Only you can view the item
- My Contacts: Only your contacts can view the item
- Members Only: Anyone who can log in to ALA Connect can view the item, which includes non-ALA members who have created free accounts in Connect
- Public: Anyone with a link to your profile can view the item, even those who aren’t members of ALA Connect
To view a short video on this,
click here.
- Email Preferences let you decide whether to receive emails regarding one-on-one interactions such as "reply to sender" emails, contact requests, and @mentions in discussions.

- The Promotional Emails option does not currently affect any notifications you'll receive, as ALA is not sending promotional emails through this system.
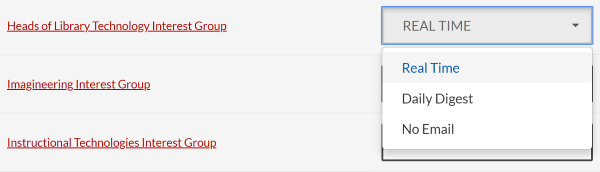
- Community Notifications let you set emails from any group to Real Time, Daily Digest, Consolidated Weekly Digest (can include multiple groups' content), or No Email.
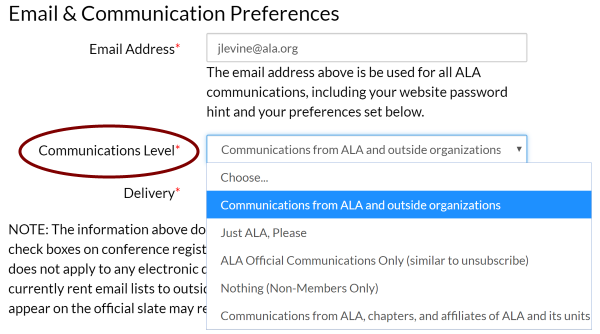
- Communication Preferences let you set what types of email and print communication you want to receive from ALA outside of Connect. These are found on your Profile, underneath your profile photo, when you click on the button that will let you edit your contact information and communication settings. If you edit these settings, be sure to scroll to the bottom to click on the Save button, and then click on the Refresh My Profile! link under your contact details to publish your changes.
- If you're logged in, you'll see your name in the upper right-hand corner.
- Click on the arrow next to your name and select the Profile button.
- Underneath your profile photo is a button labeled "Edit Address and Communication Settings" that will let you edit your address, phone numbers, and email address. This is where you can set your Communication Level for non-ALA Connect email and print communication. The options here are:
- Communications from ALA and outside organizations (You'll benefit from the most exposure to announcements, activities, and event notifications.)
- Just ALA, Please (You'll receive only communications from ALA and your member groups, such as divisions and round tables.)
- ALA Official Communications Only (Similar to unsubscribe. You'll receive only your ballot, journal subscriptions and renewal information. You will not receive communications from your divisions, round tables, committees, or other groups.)
- Nothing (Only non-members can select this option.)
- Communications from ALA, chapters, and affiliates of ALA and its units
- If you make changes, make sure you click on the Save button.
Click here for a video overview of adding pronouns. Connect users can add a
Pronouns field to their profiles and as a selectable variable in the
Signature widget that appears below their discussion posts. Sharing and using others’ pronouns is important as a way to show respect and treat others with dignity. It supports those who have to fight to have their pronouns honored. While many members already manually share their personal pronouns on Connect, we hope this dedicated field will make this process more standard and easier for everyone.
ALA Connect users can
click here to update their profile and add pronouns now.
- In the left sidebar, click the pencil icon next to the Pronouns header.
- Select your pronouns from the options. The new field allows users to select one or multiple options, and to add their own option.
- Click Save.
- After completing the Pronouns widget, add them to the signature field by going to the Discussion Signature page and selecting the variable from the column on the right side.
Note that this information isn't shared outside of Connect and by default is only visible to Connect users (users can change this in their
Privacy Settings.)
Contacts / Connections
Conduct Basic Search
- Select the Directory from any landing page in ALA Connect (Divisions and Round Tables have filtered Directories on their pages which can be found using the blue fly-out menus at the top left of the Connect home page).
- Fill in any criteria (First Name, Last Name, Email, etc.) to limit results. Note: Although none of the fields are required you must enter something in at least one field.
- Select any of the results to send a message or connect request to that person. Click the name to view their profile.
To view a short video on this,
click here.
Conduct Advanced Search
- Sign In and select the Directory from any landing page in ALA Connect.
- Select the Advanced tab.
- Select from the drop downs or scroll to the Interests to select criteria to find individuals in Connect. Note: The radio buttons default to an OR/ANY but you can further restrict the search by selecting the ALL radio button at the top of each criteria category.
- Select Search button.
To view a short video on this,
click here.
There are several ways to add contacts. When you perform a search in the Directory, you will see an “Add as contact” button to the right of each person in your search results. Just click this button to send a contact request. If you click through and view an individual’s profile, you can click the contact request link to the right of his or her profile picture.
Creating this virtual address book makes it easy to send your contacts messages through the community site to stay in touch, ask questions or even build a referral network. Additionally, when you view another member’s profile, you’ll be able to see any contacts you have in common. You can also choose to let your contacts view certain demographics in your profile that others can't.
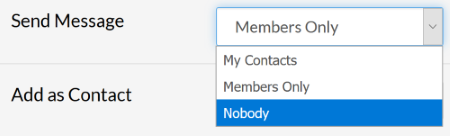
By default, anyone who is logged in to Connect can request to add you as a Contact. You'll get an email notification about the request, unless you've opted out of receiving Social Emails in your Email Preferences, and you'll be able to accept or decline the request. If you accept it, you'll appear on the person's Contacts list. You are not required to accept a request, and if you decline you will not be added to the person's Contacts list. You can hide the Send Message button from appearing on your profile by changing it to Nobody in your Privacy Settings
Anyone with an account in ALA Connect can send you a message through the site unless you opt out of receiving these messages by setting Send Message in your Privacy Settings to Nobody. Sending or replying to a message does not reveal your email address to the members your are corresponding with.
ALA Connect tries to connect you with other members who are in similar job roles and have similar interests by automatically creating networks based on information in your member record and Connect profile. My Networks can be found on your profile in the My Connections tab and are created based on:
- Job Title if you've provided this in your member record
- Principal Area of Work/Primary Work Area if you've provided this in your member record
- Type of Responsibility/Current Job Role if you've provided this in your member record
- Type of Library or Organization if you've provided this in your member record
- Interests you've added to your Connect profile
- You can update all of these fields in by viewing your Profile and clicking on the Edit Name, Title and Organization button next to your name
- Remember that you can opt out of appearing in these networks in your Privacy Settings
If you've filled out the Job Title, Principal Area of Work, Type of Responsibility, or Type of Library or Organization fields in your member record, or added Interests in your Connect profile, then you're automatically part of these networks. You can opt out of appearing in them in your Privacy Settings.
- If you're logged in, you'll see your name in the upper right-hand corner.
- Click on the arrow next to your name and select the Profile button.
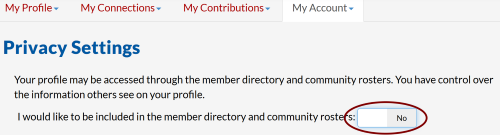
- On your profile, select the My Account tab and then Privacy Settings in the dropdown menu.
- The first option you'll see listed on the page is "I would like to be included in the member directory and community rosters." The default is set to Yes, but if you click on that setting, you can change it to No.
- If you make changes, make sure you click on the Save Changes button.
Communities / Discussions
Communities allow you to participate in discussions and share resources with other members.
Click here for a video overview of finding groups, or continue reading to learn more.
Connect is organized into groups, which includes committees, communities, discussion groups, interest groups, and more depending on your participation in the organization. Each of these groups contains a Discussion forum where you can talk with other members, and a Library where you can share resources or other files.
To find the groups you already belong to, you can use one of three methods – depending on what you’re looking for.
Find Division- or Round Table-specific groups using the Communities navigation menu
The “Communities” menu dropdown is customized based on the
site you’re on, whether it’s ALA or a Division or Round Table, and based on your membership in specific groups. You’ll always see two categories here: “All [Unit] Groups” and “All My [Unit] Groups”.
Within those categories, the links may vary: you’ll see links that the unit has chosen to “spotlight” in the first category (like the main discussion forum), and links specific to your membership in the second (for example, if you belong to committees or interest groups they’ll show up as links.)
Find a consolidated list of all the groups you belong to across the organization by using the My Connect navigation menu
The “My Connect” menu is
personalized regardless of the site you’re on, so this is the place to look if you belong to groups from multiple Divisions or Round Tables and want a list that pulls them all together. “
All My Groups” will bring you to a complete list of every groups you belong to, inclusive of all Divisions, Round Tables, and committee appointments.
Find a consolidated list of groups from any Profile
Finally, you can find groups from your (or any) profile. Select the Connections tab, and you’ll see a consolidated list of every group you (or the profile you are viewing) are currently a member of.
- Sign In to connect.ala.org and navigate to the community home page you want to join.
- If you are eligible, the blue Join Community will appear. Select it.
- Once you confirm notification frequency, the community content will be available to you.
To view a short video on this, click here.
By default, ALA Connect enables realtime notifications for all committees and daily digests from all communities, so you'll receive individual emails whenever there's a new post or reply to a committee you're on and a daily digest from any communities you've joined. You can change this in your profile at any time by adjusting your Community Notifications under My Account on your profile. ALA Connect does not send out emails when new events are added or when files are uploaded to a community's Library. Choose the frequency or opt out for any of your Connect groups using these steps:
- Sign In to connect.ala.org and navigate to your profile. (You can use the Avatar at the top right of any page in Connect once you login.)
- Select Community Notifications from the My Account tab.
- Find the group(s) for which you want to change the frequency of notifications and select an option from the dropdown menu.
- Note that once you toggle the frequency for a community, the setting takes effect immediately. There is no Save button on this page.
Every group you're a member of can be set to:
- Real Time (you'll receive individual emails whenever there's a new post or reply in a group)
- Daily Digest
- Consolidated Weekly Digest (can include multiple groups' content)
- No Email
You can also set override or alternate email addresses to your account here, if you want to receive notifications somewhere other than your primary email address.
To view a short video on this, click here.
Remove yourself completely from a community.
- Sign In to connect.ala.org, navigate to your profile. (You can use the avatar next to your name at the top).
- Under My Account, select Community Notifications. This will give you the full list of links to all of your communities in ALA Connect. (Scroll down on the screen to see the list).
- Select the title of the Community you want to remove, to navigate you to that community’s home page.
- Select the Settings button to reveal the Leave Community button.
To view a short video on this, click here.
- In groups where you don't have real-time email alerts enabled, you will see the word "Follow" and a star icon near the top of content pages like discussion threads or library entries. Clicking this icon enables real-time email alerts so that you'll be notified of future engagement with this content (whether it's discussion replies or library file modifications.)
- To see a unified list of all the content you're following, you can view it from your profile. Navigate to My Connections->Following. For each entry of followed content, you can click its links to:
- view its content page
- view the content contributor's profile
- access the content landing page where the content item is located
- review the date and time you followed the particular content item
- To unfollow content, click the star icon again. You will stop receiving real-time participation emails about it.
Click here for a video overview of using Discussions, or continue reading to learn more.
- Select the Discussions tab from the community home page. In the resulting display select Post New Message. OR from the home page of any group you belong to, select the Add button, in the Latest Discussions block.
- Fill in the Subject field.
- Type in (or post unformatted text) to the Body field of the discussion. Use the HTML editor to add links, images, formatting as needed.
- Adjust your signature, if needed.
- Add any attachments.
- Click the Send button when finished to submit the post to the community. This will generate an email notification to all of the members of the community. Any attachments will be saved into a Library Entry under the Library tab (in case you need to edit the attachments).
To reply to a discussion post, please navigate to the discussion post and click “Reply” to send your message to the entire community. To send a message to only the author of the post, please select “Reply Privately” (located in the "Reply to Discussion" drop-down).
- Click the "down" arrow next to the Reply button in your post.
- Select "Edit" from the dropdown menu.
- Update your post as needed, then click "Save".
- This will not generate an email notification, but will add a line of text saying "This post was edited by [your name]" and a timestamp of when the edit was made.
- Only admins are able to delete discussion posts, but we're happy to help if you need us! Please Contact Us and include the URL for the discussion you'd like removed.
If images are not appearing, it is likely that your email client is set to suppress images. This should be something you can change in your security or viewing options. If you would rather receive text-based email, go to your profile page and click on the "My Account" tab. Choose "Community Notifications" from the drop-down menu. Select the “Plain Text” format option for each of the discussions you are subscribed to.
Yes, please enter a keyword in the search bar located in the main navigation. To refine your search results, please select "Show Advanced Search". Try using exact phrases, wildcards, and logical operators to search ALA Connect.
ALA Connect's platform, Higher Logic, defines and explains search operators and search specific URLs on this customer support page.
Some tips for ALA Connect participants
There is not a configuration to alter the search logic from the default of “or” but there are ways to manually override by entering modifiers in the search.
Suggested search parameters are:
Exact Phrase
"value"
Wildcards
* Asterisk
Grouping (expression)
Logical Operators
AND
and
And
&&
OR
or
Or
||
and can be used to search for the unquoted text literal and or can be used to search for the unquoted text literal or
Negating
-group|filter|term
Ranges
[start TO end]
Locate the community you are interested in viewing from the appropriate communities page. Click through the community's landing page, then click on the “Discussions” tab. If you see a post you’re interested in, click the subject line which will take you to the entire thread. “Show Original Message” at the bottom of all of the posts in a thread will display the original message that started that discussion.
If you prefer to view content in Connect using a feed reader, you can set up a custom RSS feed from your Profile using the below steps:
- Click on "My Profile" and choose "RSS Feeds" from the "My Account" dropdown menu.
- In the box that says "Add a Discussion", search and select the group discussions you want to be part of the feed. You may select multiple groups, one at a time.
- Repeat the process in the "Library" sub-tab for any group libraries you want to include in the feed.
- Click the "Copy Link" button and paste the URL into the feed reader of your choice.
Library / Resources
Click here for a video overview of using Libraries, or continue reading to learn more.
Every group within Connect has a Library, which can be used to share files and resources with other members of the group. Access to each library is controlled based on the group’s own permissions, so files shared in a private committee are only accessible to that committee’s members. The system supports dozens of file types including hyperlinks, standard files (Word, Excel, PowerPoint), webinars, images and YouTube videos.
If you know which library the resource might be located in, find the affiliated community via the All Groups page. Click through the community's landing page, then click on the “Library” tab . If you do not know where the resource might be, enter search terms in the main search box the same way you might enter search terms into Google or another search engine.
Yes. Enter your desired keyword in the main search box. From the search results page, click "Show Advanced Search." Then click on “Search for Specific File Types.” This gives you the option to specify file type: Document, Image, Spreadsheet, etc.
Yes. In the default List view, the Library sorts files by Most Recent by default, but clicking on the Most Recent button will display a dropdown menu that allows you to re-order the library's files by any of the below criteria:
- Title A-Z
- Title Z-A
- Most Viewed
- Top Scorer
Files can be uploaded to Connect using Create a Library Entry (or by attaching files to a discussion post). Although a direct upload to a Library Entry will not send a message to the community, you will be able to place the file in the folder upon upload, and arrange the file order.
Files can be uploaded to Connect using Create a Library Entry (or by attaching files to a discussion post). Although a direct upload to a Library Entry will not send a message to the community, you will be able to place the file in the folder upon upload, and arrange the file order.
Upload to a specific group (like a Community or Committee)
- Sign In to ALA Connect at https://connect.ala.org.
- Navigate to your group home page. Select the Library tab.
- Select the Create New Library Entry button from the side of the page.
- In the resulting window, name the Library Entry and complete the description field if needed. Select an entry type. Most common files should be Standard File Upload. Click the Next button.
- Choose the files you want to include in the upload. There are several options on the left side of the page or you can click the Choose button in the center of the page to navigate to the files you need to upload.
- Choose the files you want to include in the upload. Navigate to the files you need to upload. In the resulting window, select the files. NOTE: Avoid using illegal characters [spaces, periods, @#$%^&*() and commas in the file names]. Click the Upload button.
- In the resulting window, confirm that the files were included. Select the Next button to rearrange the files using drag and drop or select the Finish button.
- Once the upload is complete, use the Actions button to get the permanent link to post to a discussion to alert the community members that the files are available.
If you’re a Community Admin for the group, you can also organize files within the Folder view.
- Click the Folder icon in the filters at the top of the Library entries list
- In the left Folders panel, you can create new parent and child folders, and add/move/and delete existing folders.
- To create a new folder:
- Click New for a main-level folder, or New Child (after highlighting the parent folder you want)
- Type a descriptive name in line with the group naming conventions
- To move an existing folder:
- Highlight the folder you want to move
- Click the scissors/Cut icon
- Click the clipboard/Paste or Paste as child icons (after highlighting the parent folder you want)
- In the right Folder Contents panel, you can upload new files and move or delete existing ones
- To upload a new file, click the New button under Folder Contents
- To move an existing file to another folder
- Highlight the file
- Click the scissors/Cut icon under Folder Contents
- Under the left Folders panel, switch to the folder you want to move the file into
- Back under the Folder Contents panel, click the clipboard/Paste icon to add the file to the folder you want
The system supports over 70 file types including hyperlinks, standard files (Word, Excel, PowerPoint), webinars, images and YouTube videos. Maximum file size is 1GB.
Tags are great way to organize and categorize content on your site. Tags can be applied to blogs, library entries, events, and glossary terms. Tagged items are prioritized in the search results.
The Community and Site Administration section is displayed to logged-in community and site admins only. If you need to access this content and aren't able to see it, please contact us here.